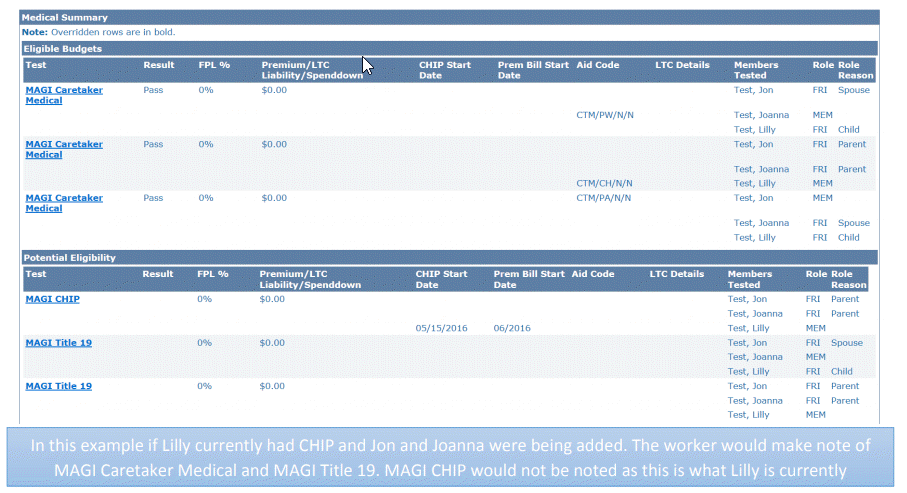

When a request for coverage for a new individual is received on an open case, and the consumer also reports an income change, the income will be updated in the month of application. Policy allows coverage to change for the existing household members beginning in the month of the reported income change going forward. Coverage should not be allowed to change retro actively. Because of this, a special process is needed when the new individual has requested prior medical (PM) coverage, and reported an income change. Outlined below is the process the worker should follow to ensure all members currently receiving coverage do not change coverage in Prior Medical months.
This process assumes the worker has identified an Add a person request with an income change and prior medical request and the worker is ready to run EDBC.
On the Case Summary page, in the All People Associated with the Case section select the hyperlink corresponding to the name of each member currently receiving coverage. Active coverage will display at the top of the Person View page for each individual.
Determine the coverage each individual, currently receiving coverage, was receiving in each prior medical month.
Note: Some members may not have received coverage in any of the PM months or may have only received coverage in some of the PM months. Make note of all individuals who received coverage in the prior medical months, the coverage they received and the months they received coverage.
Run EDBC for each prior medical month to determine if any of the following apply. Do Not accept any EDBC at this time. Repeat steps a and b below for each PM month.
For each individual currently receiving coverage determine if coverage has changed.
Coverage has not changed for any individual: no action is needed. This job aid is complete. No further action is required.
Coverage has not changed but the premium has lowered, make note of what the premium amount should be and this will be addressed in step 7.
Coverage has changed for any individual: continue to b.
For each individual that has a change in AID code make note of what the coverage changed to and what that individual is potentially eligible for. (Do not include what the individual currently is receiving)

Once each PM month has been reviewed navigate to the Customer Options List page.
Add a Customer Option record for each person identified in Step 3b. Include the medical program that coverage changed to, as well as all potentially eligible programs listed in step 3.
If all PM months are the same, the Begin and End Dates can be a range of all PM months, e.g. 01/01/2016-03/31/2016.
If coverage is not the same in all PM months, a separate record will need to be created to account for each month where coverage was different, e.g. Coverage change was PLN in 01/16-02/16 and CTM in 03/2016. Customer option would be created for PLN with begin date of 01/01/2016 and end date of 03/31/2016 and CTM Customer Option would be 03/01/2016-03/31/2016.
Note: All Customer Option records should always have an end date. Also, for this process, the records should only span the PM months. For other approved customer options scenarios see the KEES User Manual.
Once all Customers Option records have been entered, Run EDBC beginning with the first PM month. If no individuals have CHIP (PLT) with a premium skip to step 8.
Note: The process below may ask the worker to Accept and Save EDBC, only workers who are authorized to approve each case should do so. The current processes on when to accept EDBC should be followed.
For individuals who are CHIP (PLT) with a premium and the premium is being lowered, an override will be required.
From the Medicaid EDBC Summary page, click the Override Medical Summary button at the bottom of the page. The Medicaid EDBC Override List page displays.
Click the Override button for the CHIP child’s passing MAGI CHIP budget.
Enter the correct premium amount in the Premium/LTC Liability/ Spenddown field.
Enter the Start Date and End Date. (As these dates do not affect eligibility in any manner, a worker can use the first/last day of the month they are processing in).
Update the CHIP Start Date and the Prem Bill Start Date to reflect the month the worker is processing. (CHIP Start Date should use the first of the month and be in a MM/DD/YYYY format. Prem Bill Start Date should be in a MM/YYYY format).
Verify all persons (other than the CHIP child) in the IBU have a Role of FRI and an appropriate Role Reason. Example: Primary Applicant, Spouse (of the PA), or Sibling.
Click the Save and Return button. The Medicaid EDBC Override List page displays.
Note: Repeat Steps 7a - 7g for each passing CHIP child with an incorrect premium, when finished continue with step 7h.
In the EDBC Override Reason select Administrative Decision.
Place a check in the checkbox next to the new budget you have just created.
Click the Save and Return button. The Medicaid EDBC Summary page displays.
Confirm all results look correct. Click the Accept button. The EDBC List page displays.
Click the Save and Continue button.
If coverage for all members currently receiving coverage has not changed, EDBC can be Accepted and Saved.
Run EDBC in application month. Coverage in this month will be allowed to update accordingly. EDBC will need to be run through come-up month or until high dated.
Create a Journal Entry- If Customer Options was used to complete the Prior Medical Determination, include details related to which Customer Options were used.
Send appropriate notices.