
Left click the drop-down caret next to the Documents button on the Perceptive Content Toolbar.
Select KEES Registration Documents as the desired Documents View filter. The Perceptive Content Explorer window opens.
Select Last Name from the first drop-down on the Quick Search tab.
Enter the Last Name in the search box.
Click the Go button. The search results display.
Double Click the document to view it. The document opens in the Perceptive Content Viewer.
Access Perceptive Content and click the KEES Registration Documents drawer.
Change the Quick Search drop-down menu to Last Name and enter the Primary Applicant’s Last Name.

Click the Go button.
Look for the application by Received Date.
If too many results are returned and you would like to narrow your search, proceed to STEP 5.
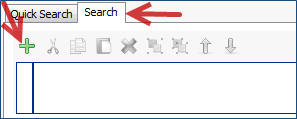
Select the Search tab and click the (green) plus sign. The Add Condition window opens.
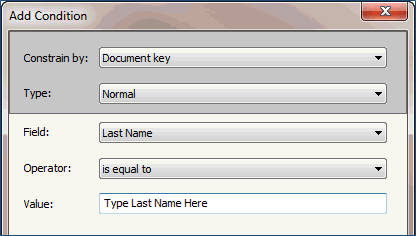
Enter the Conditions as follows and click the OK button.
Constrain by: Document key
Type: Normal
Field: Last Name
Operator: is equal to
Value: Enter the consumer's last name
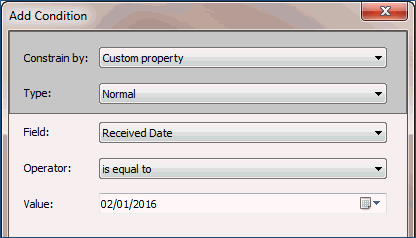
Click the (green) plus sign again to add additional Condition(s).
Constrain by: Custom Property
Type: Normal
Field: Received Date
Operator: is equal to
Value: Enter the date of application
Click the OK button.
Click the Go button.
Access Perceptive Content and click the KEES SSP Documents drawer.

Change the Quick Search drop-down menus to Case Number / SSP Application and starts with then enter the 7-digit e-App ID number.

Click the Go button.