Complete a Searching the Resource Databank to find your provider, prior to completing these steps. Write down the provider’s ID number located in the Basic Information box above the name of the Provider.
Select Services from Global Navigation. Select Support Services from Local Navigation. The Service Arrangements List page displays.
Click the Add Service Arrangement button. The Service Arrangement Detail page displays.
Select the radio button associated with the appropriate Type in the Need section.
Click the Select button in the Activities section. The Select Customer Activities page displays.
Select the radio button for the appropriate Activity Name.
Click the Select button. The Service Arrangement Detail page displays.
Enter the Arrangement Period in the Arrangement Detail section using the <mm/dd/yyyy> format or the calendar icon for the From and To fields.
Select a Program Type from the drop-down menu.
Select Same as Provider from the Payee drop-down menu, a Select button dynamically displays below Provider.
Click the Select button. The Select Service and Provider page displays.
Enter the Resource Name and address.
Click the Search button. The Select Service and Provider search results page displays.
Select the radio button for the appropriate Name and Service Type.
Click the Select button. The Service Arrangement Detail page displays.
NOTE: The Issuance Method auto-populates to SMART Issuance.
Select Yes from the Voucher drop-down menu.
Enter the actual amount of the goods in the Total field.
Click the Save and Return button. The Service Arrangements List page displays.
Click the Need Type hyperlink. The Service Arrangement Detail page displays.
Click the Generate Voucher button in the Arrangement Details section. The Document Parameters page displays.
Click the Select button. The Select Resource page displays.
Enter the Provider’s Name and ID number and click the Search button. The Search Results Summary page displays.
Select the radio button for the appropriate Provider.
Click the Select button. The Document Parameters page displays.
Enter the case number. Click the Go button. The Document Parameters page redisplays.
Select Program and Consumer Name from the drop-menu. Enter the Service Authorization ID number.
NOTE: The Service Arrangement ID for this service arrangement is your Service Authorization ID. It is on the first line of this service arrangement.
Click the Generate Form button. The form displays in PDF format with populated case and office information. Enterable fields are shaded.
Enter the applicable information in the shaded fields.
Review form for accuracy and click the Save and Print Locally button.
Click the upper right hand corner to close the pop-up box.
Click the Close button to close the Service Arrangement Detail page.
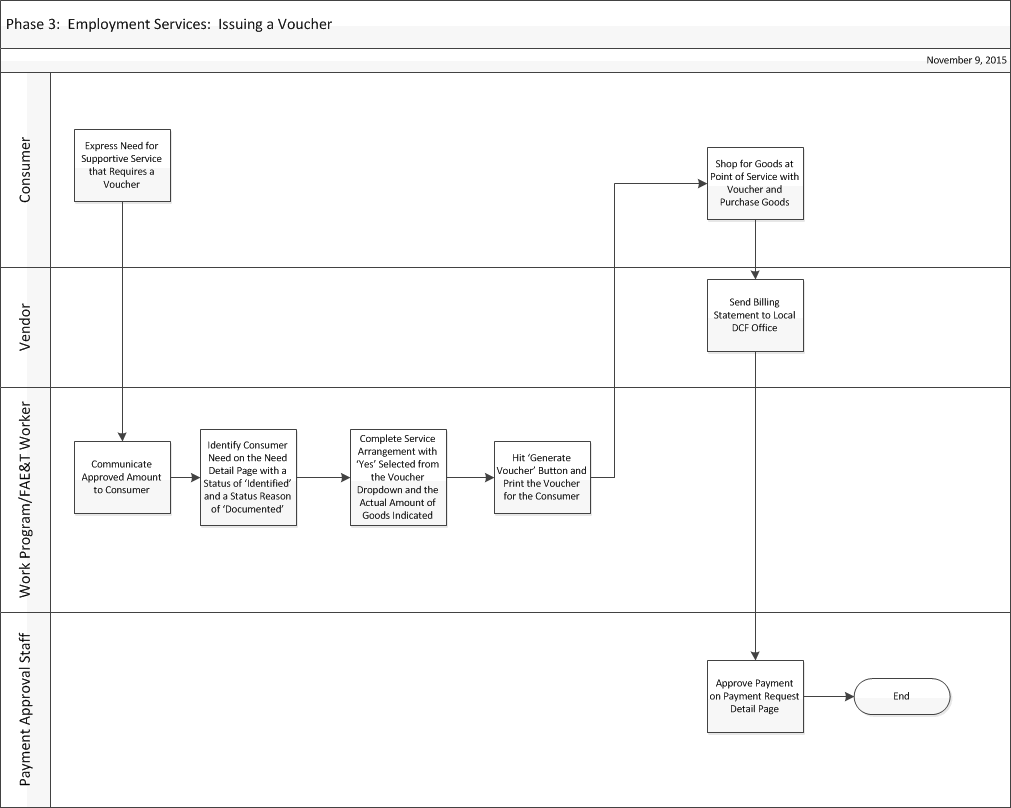
This business process flow shows the high level steps utilized to issue a voucher for Employment Services supportive services in KEES.
Discuss the request for supportive services with the consumer and communicate the approved amount.
Identify the consumer’s need on the Need Detail page with a status of Identified and a status reason of Documented.
Indicate the Need, Vendor, and Amount on the Service Arrangement Detail page. Select Yes from the Voucher drop-down menu.
Generate the Voucher for the consumer.
Receive bill from the Vendor after the consumer purchased their goods.
Approve the payment on the Payment Request Detail page.
All work is processed in KEES.
A consumer Need must be identified and indicated in KEES in order to complete a Service Arrangement and approve a Payment Request.
N/A